While there’s nothing quite like flower bouquets, eventually these fresh blooms will fade – with the exception of dried bouquets of course. However, that doesn’t mean you have to get rid of the flowers. Pressed flower cards are a great way to give your flowers a second life and flex your creative muscles.
Even though pressed flower cards look difficult to make, they’re actually simple. All you need is some flowers, a bit of patience, and the proper knowledge. Luckily for you, we’re going to guide you through the steps of making your own card. And we’ll include some insider tips and tricks to make the process a bit easier. So grab your flowers and get ready to create a handmade masterpiece!
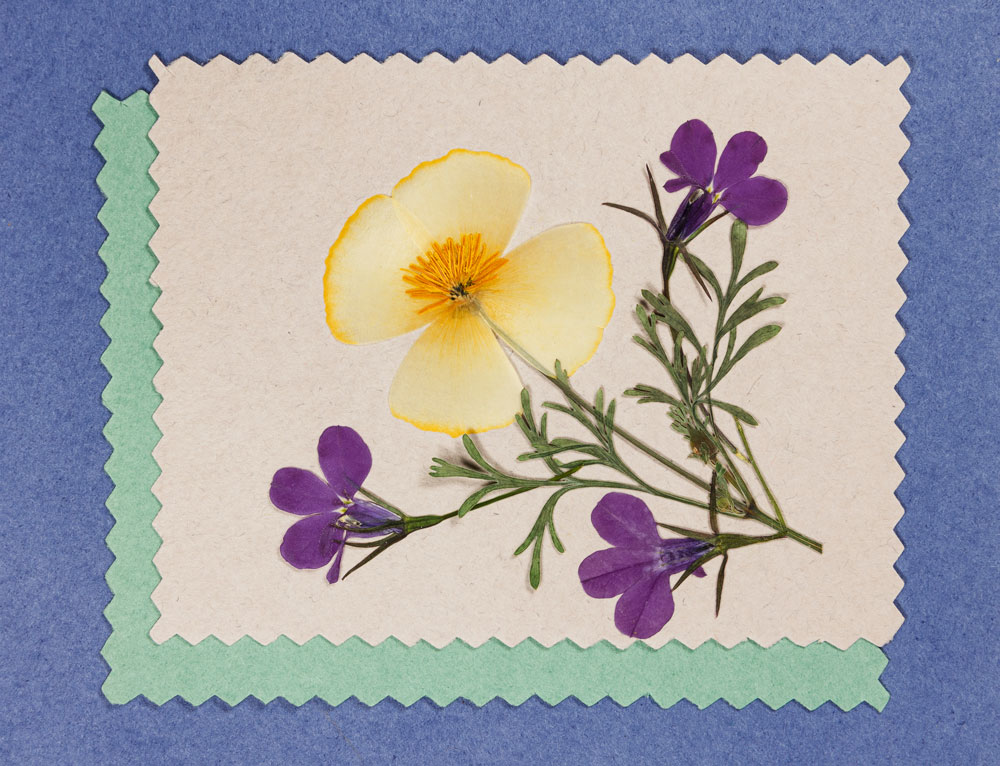
How to Create DIY Pressed Flower Cards
What You’ll Need
Before you get started pressing your flowers and making your cards, you’ll need to round up the necessary supplies. Gather the following before you start creating.
- Fresh flowers
- Heavy books
- Newspaper
- Cardboard
- Craft glue
- Small paintbrush
- Thick paper or card stock
- Tweezers (optional)
Instructions
After you’ve gathered your materials, you want to follow these steps.
Acquire Flowers
The first step in creating a pressed flower card is finding flowers! You have many options when it comes to finding flowers. Take a stroll through your garden or pick up a fresh bouquet. However, don’t think you need fresh blooms! Pressed flower cards are the perfect way to reuse old flowers that are beginning to wilt.
Before you grab any flowers, be aware that some flowers dry better than others. The best options are thin flowers with single layers of petals. Poppies, violets, tulips, and pansies are all great choices. Small, lacey flowers like Queen Anne’s lace and goldenrod also press well.
Thick blooms like roses and sunflowers aren’t the best candidates for pressing due to their large size. However, you can remove and press individual petals.
Don’t forget that you can use greens as well as blooms. Some beautiful greenery to press includes eucalyptus and ferns.
Arrange the Flowers

The second step to creating your card is pressing your flowers. This involves putting pressure on the flowers while they dry so you end up with flat dried flowers.
Once you’ve found flowers you like, place them on a sheet of newspaper. Arrange the leaves and blooms so they’re in good shape. Once the flowers are dry, you won’t be able to rearrange them, so now is the time to tinker with styling.
Once you’ve found an arrangement you like, add another sheet of newspaper on top of the blooms.
Press the Flowers
Place the two sheets of newspaper between two sheets of cardboard. The cardboard will help draw moisture out of the plants while also allowing room for a bit of airflow. Next, place the cardboard sandwich between two heavy books. If you need more weight, you can add additional books or weights on top.
Try to place the stack in a well-ventilated area so it dries quicker. This also helps prevent the development of mold. After five days, check your flowers. If they are still soft, allow them to dry a bit longer. While you can’t rearrange your plants completely, you can make small adjustments when your plants are flattened but not dry.
Once the plants are dry and brittle, it’s time for the next step.
Remove the Flowers
Once your flowers are dry, it’s time to remove them from the press. If there’s ever a moment to be careful, it’s now! The dried petals and leaves are delicate and susceptible to breaking — handle with care.
Style the Flowers

Now it’s time to get creative. While white card stock is the de facto choice, don’t be afraid to play with colored paper. Brown craft paper gives a rustic feel while gold paper is a perfect choice for a wedding or bridal shower card.
Lay out your card stock or other paper and start arranging your flowers. If you find it’s difficult to pick up the dried material, try using a pair of tweezers. Continue tweaking your flowers until you find a style you like. Don’t be afraid to remove individual blooms and layer materials on top of each other.
If an item is too large to add to your card, you can carefully trim it using a pair of scissors.
Glue the Flowers
After you’ve found an arrangement you love, the next step is glue. Carefully pick up each dried item and use a small paintbrush to gently apply glue to the back. If you find the glue is ripping delicate petals, try diluting the glue with a bit of water. This will make it easier to apply, yet it will still hold the material once it dries.
After you’ve applied the glue, place the pressed flowers on the paper. Gently press down on the materials to firmly attach them to the paper. Once everything is glued down, let the pressed flower card dry overnight. If you find that bits of plants are popping up, use a small object like a washer to weigh them down.
Customize Your Pressed Flower Card
Once you have a design you love, it’s time to customize the card! A heartfelt message sweetens the card, and hand-drawn vases or stems add a bit of character.
Five Greeting Card Ideas
While a pressed flower card makes any day better, you may want to make a card for a certain special occasion. If that’s the case, you can make a design of your own or follow one of the ideas below.
Birthday Card
Birthdays are times to celebrate! When it comes to cards, we’ve got a few great ideas.
One option is to make a card using the birthday person’s birth flowers. Another option is to include a flower or petal for each year of the person’s life.
Anniversary Card
Anniversaries are a time to celebrate love, both old and new. The perfect card will let the recipient know you love them now and forever.
One great idea requires a bit of thought, but it’s sure to bring a smile to your partner’s face. Think back to your wedding flowers. If possible, find and press similar flowers. If you’re not celebrating a wedding anniversary, think of flowers from a special occasion you celebrated together.
When your partner receives the card, they’ll be reminded of the love you’ve shared in the past as well as the love that exists today.
Mother’s Day or Father’s Day Card
Parents helped us grow into the people we are today. By using a bit of creativity, you can create a gift that conveys this realization.
Gather multiple arrangements of the same flower. For example, if you are pressing a poppy, obtain a small sprout, an unopened flower bud, and a full bloom. Press all of these items so they are flat and dry.
Glue these pressed items on a card to show growth over time. Pair with the words “thanks for helping me grow” and you’ve got a winning gift.
Just Because Card
You never need a reason to send someone a reminder that you’re thinking of them. While plain cards are great, pressed flower cards elevate mail to a whole other level!
One art idea is to press your friend or loved one’s favorite flower. Not only will they smile when they receive the card, but they’ll also be able to keep the card for years to come. Another option is to press a flower that brings back memories of a special moment.
Sympathy Card
While losing a loved one is never easy, having the support of others makes it a bit more bearable. When someone close to you is grieving, pressed flowers will let them know you’re thinking of them and add a bit of beauty to their day.
If you’re using traditional sympathy flowers like white lilies or white rose petals, don’t glue them onto white paper. Instead, place these flowers onto colored paper so they stand out.
DIY Crafts with Dried Flowers
While cards are a great way to use pressed flowers, you can also use them in other art projects.
Dried Flower Candles
Is there anything more romantic or relaxing than candles and flowers? To combine the two, create some dried flower candles. While these candles look like they’re straight out of a hip boutique, they’re quite simple to make. The process involves attaching the dried flowers to a mason jar using melted wax rather than glue.
Wall Hangings
When you create a card, you’re generally working with a small 4×6 or 5×7 piece of paper. If you’re working with large pressed flowers, wall hangings are a great project idea.
The process of making a hanging is similar to a card, except that you’re gluing the flowers onto a larger piece of cardstock or paper. Once the piece is dried, frame it and hang it for moments to come!
Wall hangings make great new home gifts. To make this gift extra special, press the state flower or a plant that is native to the recipient’s home.
If you need some more ideas you can try making a dried flower wreath either for the fall season or for the holidays. And whenever you need some fresh flowers for an arrangement that you can then use for pressed flower cards or other DIY crafts projects, visit The Bouqs Co. and place your flower order online.
Shop All